A classroom, a familiar path and a simple map can give children plenty of geography to investigate. The useful step is turning “find this place” into a task that asks pupils to explain a position, use evidence or check how a map represents the world.
Elementary geography activities work best when pupils use maps and observations to answer a clear question. These seven tasks develop classroom mapping, symbols, cardinal directions, grid distances, place observation, feature classification and weather recording. An original printable pack includes a fictional practice map, recording sheets and a teacher answer key.
How to use this article: Start with the printable pack, try the distance task, or plan a supervised observation activity.
1. Choose a Task by Skill, Not Age Alone
These seven activities move from representing a familiar room to reading a practice map, comparing distances and gathering observations. Choose the entry point from what pupils can already do. A younger child may explain a route clearly aloud, while an older pupil may still need practice matching a symbol to its key.
| Activity | Suggested ages | Evidence to look for |
|---|---|---|
| 1. Classroom plan | 5–7 | Objects shown in useful relative positions |
| 2. Symbols and key | 5–8 | Symbols interpreted through a matching legend |
| 3. Cardinal directions | 7–9 | Directions read using the north arrow |
| 4. Grid distances | 8–11 | Steps multiplied by the stated ground distance |
| 5. Place observation | 6–11 | Recorded evidence separated from explanation |
| 6. Human and physical features | 7–11 | A classification supported by a reason |
| 7. Weather record | 6–11 | Conditions dated without claiming a climate trend |
Use the original printable pack
Download the geography activity sheets and teacher answer key. The fictional neighborhood map supports Activities 2–4; the blank plan and observation pages support the other tasks. No login or pupil information is needed to use the sheets. The four-page PDF is about 48 KB. It is a static printable, not an interactive or tagged accessible form; equivalent task instructions and answers appear in the HTML below. Print with “Fit to printable area” if needed for A4 or US Letter, and use the stated grid distances rather than a ruler on a resized page.
Age bands and lesson times below are planning suggestions, not results of a classroom trial. The map questions and calculations have been checked against the original worksheet. Teachers should adjust vocabulary, pace, reading load and supervision to their pupils.
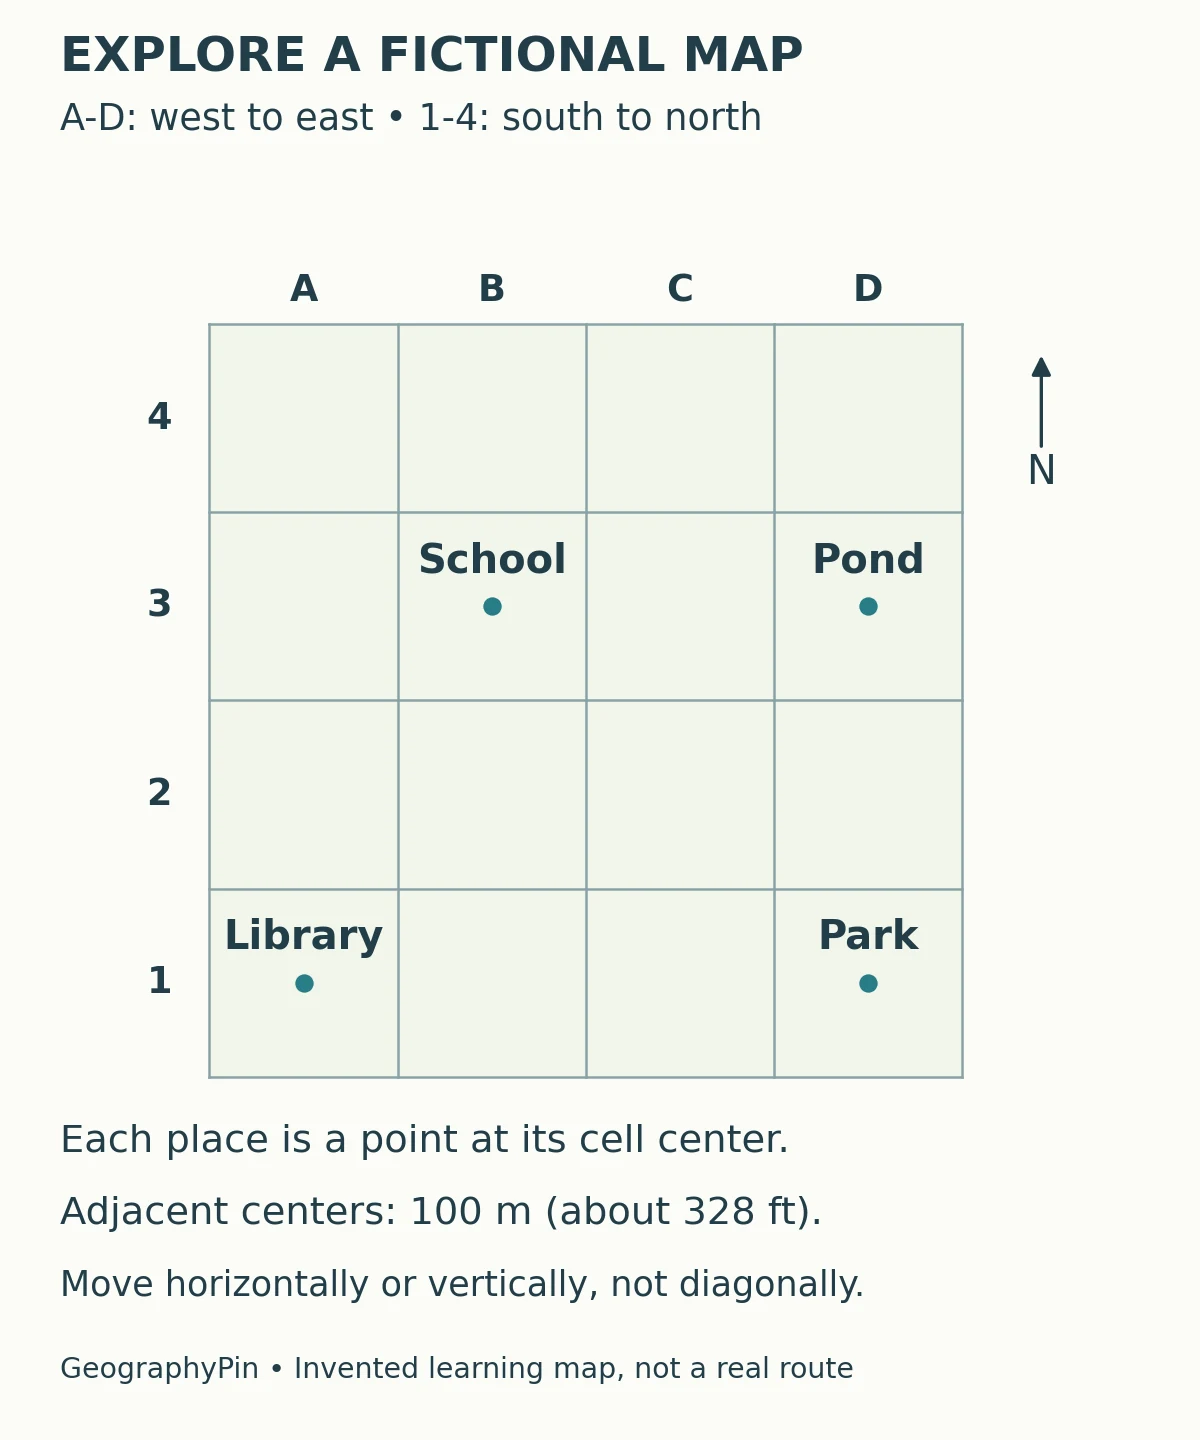
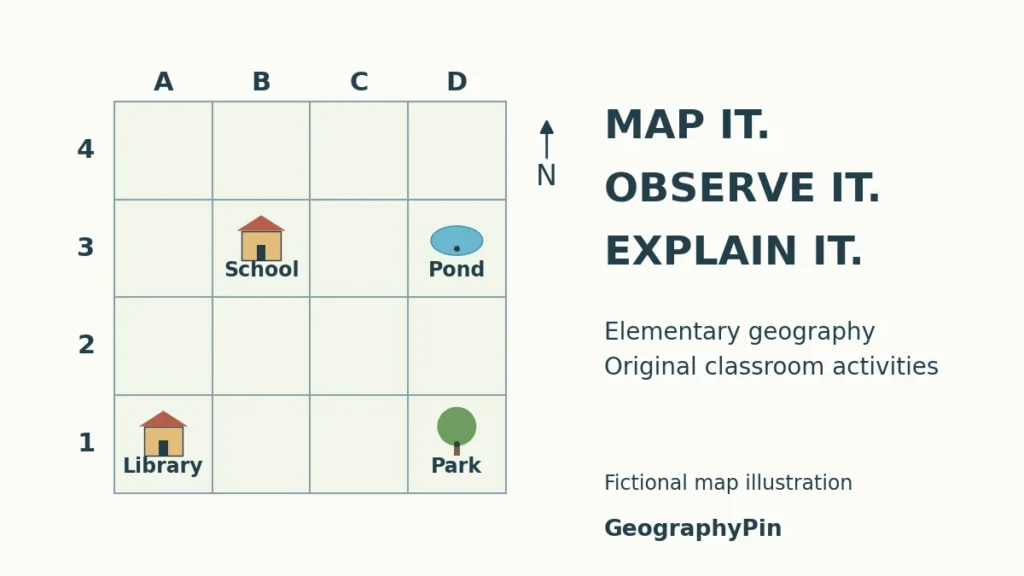
The practice map is deliberately fictional. Its symbols are point locations at grid-cell centers, not real building footprints, public roads or a safe route to follow outdoors. Columns A–D run west to east; rows 1–4 run south to north. This is a simple classroom cell-label system, not an official national grid reference.
2. Make a Classroom Plan
Activity 1: Turn a familiar room into a plan
Suggested ages: 5–7. Planning time: 20–30 minutes. Materials: blank plan sheet or paper, pencil, optional object counters. Learning goal: represent positions from above rather than drawing a front-facing scene.
- Choose a small, uncluttered part of the classroom. Identify four fixed features, such as the door, teacher’s desk, reading area and cupboard.
- Ask pupils to arrange simple shapes as if looking down on that area. Draw the room boundary before adding the features.
- Create two or three symbols with a short key. Invite a partner to identify the features using that key.
- Ask which object is nearer the door and what lies between two chosen features. Compare the plan with the room.
Expected result: plans will differ, but features should keep their useful relative positions. A cupboard does not need a detailed picture; its symbol and location should make sense together.
Teacher check: ask a pupil to explain one placement instead of judging drawing quality. Do not label an approximate sketch “to scale.” For a real-room north arrow, establish the direction rather than assuming that the top of the paper is north.
Adaptation: provide movable symbols or a partially completed boundary. A pupil can dictate placements or point to objects while a partner records them; an overhead photograph is not required.
3. Read Symbols and Follow Directions
Activity 2: Build and test a map key
Suggested ages: 5–8. Planning time: 10–15 minutes. Materials: fictional neighborhood worksheet. Learning goal: create a consistent legend and use labels to identify places.
- Read the four place labels on the supplied map; its dots mark locations rather than different feature types.
- Locate the school, library, park and pond. Name the cell containing each feature.
- On a copy, give each place a distinct small symbol and draw a matching key. Cover the place labels and ask a partner to identify the features from the new key.
- For an extension, invent a fifth symbol for a different feature, add it to a spare cell and update the key.
Expected answers: school B3; library A1; park D1; pond D3. The extra symbol has no single correct design, but its use on the map and in the key must agree.
Teacher check: ask pupils what evidence identified a feature. Do not make color the only clue; use shape, a letter or a written label too.
Activity 3: Give directions without relying on left and right
Suggested ages: 7–9. Planning time: 15–20 minutes. Materials: the same map and a pencil. Learning goal: distinguish cardinal directions from page-relative movement.
- Find the north arrow. On this particular worksheet north is at the top, east is right, south is down and west is left.
- Ask for the direction from the school to the pond, then from the library to the park.
- Describe an orthogonal route from the school to the library: move along grid directions, not diagonally.
- Rotate the whole page with its north arrow attached. Ask pupils to identify the same directions again.
Expected answers: school to pond is east; library to park is east. One school-to-library route is one square west followed by two squares south. After rotating the sheet, the geographic directions remain tied to its arrow, not to the top of the desk.
Teacher check: if a pupil says “right,” ask which compass direction that means on the map. North is not universally page-up, and it does not mean “up into the sky.”
4. Use a Grid to Compare Distances
Activity 4: Compare route length and direct distance
Suggested ages: 8–11. Planning time: 15–25 minutes. Materials: map worksheet and pencil; calculator optional. Learning goal: convert grid steps into represented ground distance.
Each horizontal or vertical step between adjacent cell centers represents 100 meters, about 328 feet. Use meters for the exercise arithmetic so that rounded conversions do not accumulate. This distance is assigned to the fictional map, not measured from a real neighborhood.
- Count the eastward steps from the library at A1 to the park at D1. Multiply the count by 100 meters.
- Trace the school-to-library route from Activity 3 and add its westward and southward steps.
- Compare the two totals. Explain why equal route lengths do not require the same direction or shape.
- Draw a direct line from school to library. Decide whether it would be shorter than the right-angle route without claiming it is a usable path.
Expected answers: library to park is three steps, or 300 meters, about 984 feet. The specified school-to-library route is also three steps and 300 meters. The diagonal straight line is shorter, but the activity does not require calculating its length or treating it as an actual walking route.
Teacher check: count the spaces between centers, not the number of squares touched by a label. The school is in column B and the library in A, so the westward difference is one step, not two.
Resizing the worksheet does not change these stated grid relationships. Measuring the printed page in inches and assigning a ground distance would be a different task requiring a controlled print scale. A scale bar must be resized together with its map, never independently.
5. Investigate a Familiar Place
Activity 5: Separate observation from explanation
Suggested ages: 6–11. Planning time: 20–30 minutes including discussion. Materials: observation sheet and pencil; an approved indoor view or supervised school-ground location. Learning goal: record what can be observed and identify what remains an inference.
- The teacher chooses a bounded, accessible observation spot and an inquiry such as “How is this part of the school grounds used?”
- Record three visible features and their positions. Do not record names, faces, home addresses or other personal information.
- Write one possible explanation separately. For example, a bench near a path may suggest a resting place, but its position alone does not show how often people use it.
- Compare observations with a partner and identify one question that would need additional evidence.
Expected result: answers depend on the place. “There are two benches beside the path” is an observation if actually counted; “this is everyone’s favorite place” is an unsupported conclusion unless suitable evidence is collected.
Teacher check: require a location as well as a feature name. Follow the school’s risk assessment, permissions, supervision and accessibility arrangements. This activity does not require crossing roads, approaching water, leaving the grounds or observing strangers. Use a window view or teacher-provided non-identifying scene when outdoor access is unsuitable.
Activity 6: Classify features and explain the difficult cases
Suggested ages: 7–11. Planning time: 10–20 minutes. Materials: paper or the observation sheet. Learning goal: recognize human and physical features without oversimplifying managed landscapes.
- Use the examples hill, stream, classroom building, paved path, planted tree and artificial pond.
- Sort clearly physical landforms and water features separately from built structures.
- For the planted tree and artificial pond, explain which parts involve natural processes and which involve human choices.
- Apply the same reasoning to one observed feature, stating when its origin is unknown.
Expected answer: the hill and stream are physical-feature examples; the building and paved path are built features. A planted tree is living vegetation deliberately placed by people, while an artificial pond is a human-created water feature. A good answer describes that combination instead of forcing every example into an unexplained either-or box.
Teacher check: do not infer that an unfamiliar pond is artificial merely because it is beside a school. Classification should follow the description or evidence available.
6. Keep a Short Weather Record
Activity 7: Observe weather without calling it climate
Suggested ages: 6–11. Planning time: 5–10 minutes on three occasions, plus a 10-minute comparison. Materials: observation sheet; thermometer optional under teacher supervision. Learning goal: record conditions consistently and limit conclusions to the observations.
- Choose a safe observation point or indoor window. Record the date, time and location each time.
- Describe cloud cover, visible precipitation and evidence of wind using the same terms on each occasion. Do not look directly at the Sun.
- If temperature is measured, use the same instrument and suitable consistent setup; a sun-heated window reading should not be treated as standard outdoor air temperature.
- Compare the three records and write one statement supported by them.
Expected result: the weather may change or remain similar. A valid conclusion might be “Rain was visible during two of our three observations,” if that is what the records show. The worksheet’s blank spaces do not imply that pupils should invent observations when a session is missed.
Teacher check: three observations do not establish the climate of a place or a climate-change trend. NOAA distinguishes short-term atmospheric conditions from long-term patterns. If unsuitable conditions make observation unsafe, remain indoors and use clearly labeled example data for a separate practice task.
7. Check Answers and Adapt the Activities
Check reasoning as well as answers
The printable teacher key gives fixed answers for the fictional map and explains why local observations and classroom plans cannot have one universal answer. Ask pupils to show how they used a symbol, counted a step or distinguished evidence from a guess. A correct answer reached by an unrelated shortcut may hide a misunderstanding.
For younger pupils or emerging readers, read the instructions aloud and accept pointing, moving counters or spoken explanations. Use large, high-contrast copies and labels in addition to color. For pupils who cannot use the chosen outdoor location, offer an accessible observation point or equivalent indoor scene rather than excluding them from the inquiry.
For an extension, ask older pupils to design a new fictional map with a consistent key and then exchange it with a partner. The partner should check whether the directions and distances can actually be answered from the information provided. Do not add a north arrow or a scale merely as decoration: each must agree with the task.
Keep the activities focused on geographic thinking rather than drawing skill or speed. Our geography explainer offers a broader introduction to relationships among places, environments and people; use an atlas or a suitable local map when moving beyond these deliberately simplified practice sheets.
What Did We Learn Today?
Geography activities become useful when pupils explain how they know an answer. A key gives symbols meaning, a north arrow establishes direction, grid spacing supports distance calculations, and observation supplies evidence about a place. Suggested ages are flexible, fictional maps are practice tools, and a few weather records do not describe a climate.
Sources & Data Notes
Activities, fictional-map geometry and printable sheets are original GeographyPin resources. The references support geographic concepts and teaching approaches, not a claim of endorsement or classroom trial. Age bands and times are editorial planning estimates; fixed map answers were checked against the supplied diagram. Local observations vary and must not be invented.
- National Geographic: Classroom Map. Background on using familiar spaces to develop map interpretation; its illustrations and worksheets are not reproduced.
- National Geographic: Cardinal Directions and Maps. Background on compass roses and directional reasoning. No continent or ocean-count exercise is taken from this resource.
- Royal Geographical Society: Map Skills, Year Two. Guidance on symbols, keys, familiar places and scale.
- Royal Geographical Society: Primary Fieldwork. Inquiry in nearby places and teacher planning and risk assessment.
- NOAA: Weather and Climate. The distinction between short-term observations and long-term weather patterns.